Home Hot Pot

April 5th, 2009

homehotpot

Danny, knowing how much I love Shabu Shabu (and strangely, how I dislike hot pot) slyly made us (mostly me) this home-made poor man’s hot pot! Ingredients are left over vegetables from Tachibana‘s shabu shabu, chicken cup noodles that I snagged at Lotte super cheap. I’m sure there’s also some rooster sauce in there knowing Danny.

Look, he even served it to me with my Totoro chopsticks! <3

Eggs Three Ways

Here’s documentation on my recent egg efforts!

Over Easy, Served with Naan and Home-made Frites

frites2

frites1
April 25th – Constructed by Danny

Bear-shaped Hard Boiled Eggs

hardboiledbeareggs
April 24th – I boiled four eggs (along with a cup of rice and 1-1/2 cups water) in my rice cooker. They were cooked perfectly (like they always are)! Three of them were for Dan, so he ate two of them (just the whites) and saved the other. I peeled mine and put it into a plastic boiled egg mold, snapped it shut, and submerged it in cold water for about ten minutes. It turned out surprisingly well, the only problem is that the egg was a little too small so the bear’s ears didn’t get filled!
I placed the spinach in the rice cooker at the end of the cycle to wilt it a little bit and served over some matzo and with some rooster sauce.

Poached Eggs
poachedeggs1

poachedeggs2
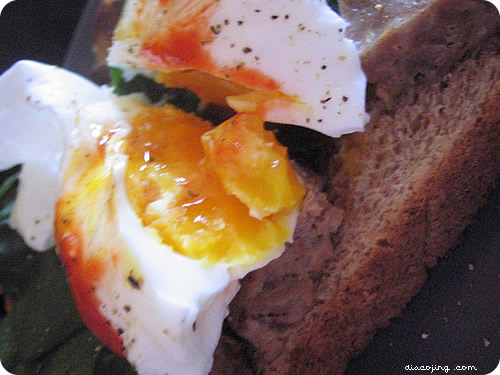
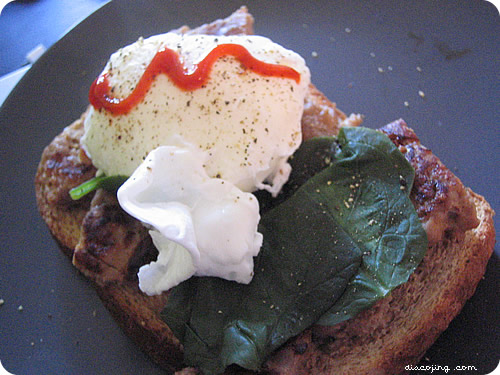
April 23rd – I was really intimidated to make these because I hadn’t made them before. Poached eggs always seemed so fancy, sitting atop little biscuits like a little pouch of liquid floating in the air. But I would argue that these are easier to make than hard boiled eggs (the conventional way)!

  1. Heat a pot or pan of water to boiling. Once water reaches a rolling boil, turn the temperature down until the water is right under the boiling point.
  2. Crack eggs into a small bowl (rice bowl) or coffee cup.
  3. Add a few drops to tablespoon of vinegar (rec: distilled white) and stir the water.
  4. While water is stirring, slide egg into vortex. Egg white will coagulate and keep egg together.
  5. Cook 2-4 minutes depending on the level of firmness you would like. (The pictured egg is almost too done).
  6. Repeat! (You can also cook more than one egg at a time–you don’t have to do the swirly vortex thing, I just like it because it makes the egg stick together)
  7. Serve with toppings/condiments. (Pictured: atop toast with baby spinach, pepper, and rooster sauce)

+ + + + + + + + + + + + + + + + + + + + + + + +

So, what do you think? Are you going to try something new with eggs soon? I’m itching to try mini-fritattas (in metal muffin liners), usui tamagoyaki (thin egg omelets), and a complicated egg omelet with real ingredients in it! Let me know how it turns out, especially since eggs are just a little over 10 cents each these days!

Pork Souvlaki with Tzatziki

I got the idea for this recipe from Serious Eats. This recipe “passes”, and gets to be written in the real Recipe book!

The main part that I kept over-looking was the “marinate over-night” part, so just to let you know, you need to marinate this over night!!! Okay, now that that’s over. This was served with red lentils cooked in chicken broth with some sprouts and roasted red pepper and toasted naan. Sounds good, right? The lentils were bad, but everything else was delicious!

Butternut Squash Soup

Say bye-bye to winter with this easy to make soup!
(Recipe adapted from SeriousEats.com)

squashsoup

  • 3/4 tablespoons olive oil
  • 1.5 pounds cut and cleaned butternut squash (usually sold like this)
  • 1/2 large sweet onion, cut into chunks or rings
  • 1/2 head garlic, cloves separated and peeled
  • 1 3/4 cups stock, divided
  • Salt and pepper
  • 1 or 2 tablespoons heavy cream (optional)

Preheat oven to 350°F. Toss squash, onion and garlic cloves with olive oil; spread on glass baking dish and pour 1/2 cup stock over the top. Sprinkle with 1/2 teaspoon salt. Bake at 350ºF for about 1 hour or until fairly soft and a little caramelized-looking; check on the pan every 30 minutes (if necessary, add additional liquid to keep it from scorching to the bottom of the pan and stir). Add squash, garlic, onion, and any liquid from baking dish into a large pot. Add remainder stock, salt, and pepper to the pot, and cook over medium-low heat for at least 20 minutes. Purée all ingredients in a blender. Add back to pot, stir in cream and adjust salt and pepper to taste.

I waited over two weeks to eat this (refrigerated it) and it still tasted pretty good! This recipe makes 3.5 cups soup, which is too much for one person, but is a great side dish or snack.

Citrus Corn Muffin Madelines/Scones

I adapted this recipe from a recipe I saw on Serious Eats for “80-Cent Citrus Corn Muffin Madelines with Raspberry Confiture“. I wanted them to be more like scones so I used these triangle silicone molds (which when filled to the line only yielded 10 servings). Even though I used more zest than the recipe called for, I should have used all of the zest of the lemon and orange because these weren’t zesty enough for me. I think they would also work well with orange or lemon extracts/juices as well.

I didn’t have whole milk so using the leftover heavy cream from the Boston Creme Pie cupcake’s ganache, I was able to make 1/3 cup whole milk out of half a tablespoon heavy cream and filled the remainder with skim milk. I used the same bottle from the boston creme pie to fill them with raspberry (very convenient!).

I won’t make these again because I don’t like the texture of corn muffins (too gritty). I’d much rather citrus-ify a normal mix or bread recipe.

  • 1 box Jiffy corn muffin mix
  • 1 egg
  • 1/3 cup whole milk
  • orange zest to taste
  • lemon zest to taste
  • ~1/4 cup raspberry jam or preserves

Preheat the oven to 400°F. In a large bowl, whisk together the corn muffin mix, egg, milk, and citrus zests. Allow to sit for 4 minutes. Then stir again quickly just before dolloping it into pans/liners. If using pan, spray or grease lightly with vegetable oil or butter. Bake for 8 minutes. After 8 minutes in the oven, pull the madeleines out. Fill with raspberry jam slowly just until the jam fills the hole and starts coming out. Bake 2 to 4 more minutes—2 minutes until done; 4 minutes until golden and crisp. Transfer to a cooling rack to cool, or eat warm with extra jam and a cold glass of milk.

scone1

scone2